CAUTION: The color codes for wires referred to in this article are for USA only - I haven't a clue as to what the wire color codes for house wiring are in any other countries. Consult your local electrician for information.
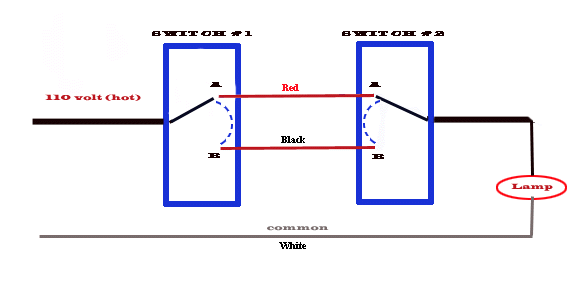
Ever wonder how they wire your hall light so that you can turn it on at the bottom of the stairs and then turn it off at the top? Then you can go back downstairs and turn it on again and then go back upstairs and turn it off again. Magic, huh? You might think that it is storing up ons and offs and someday it is just going to start going back through the cycles of all those years and start doing it all by itself. Wellll, anyway, here is a simple schematic that describes the wiring of a pair of switches that do the job. The switches are called "three way" switches (although they control the light from only two places - go figger) and they are special so if you go to replace on of them make sure you get the right one - it has four terminal screws on it as opposed to the three on a regular switch.
For those whose viewer won't get the GIF go here
Looking at the diagram above you can see how the magic is done. Three wires are required to go between the switches therefore you will need romex which contains a black wire, a white wire and a red wire - also a bare wire for the grounding function (not shown for clarity). One is called the common. It is normally white in most house wiring schemes unless some non electrical type has been doing some very amateur and dangerous switching of colors. (it happens, don't laugh!!) The common does not go through the switch. It goes right from the circuit breaker box directly to the lamp. The second wire is called "hot", which is normally black, goes to one of the switch connection screws. The third wire is red and is hot when the switch makes it hot. It goes to the other connection screw on the switch. Here is the hitch - the wires running between the two switches can each be hot, one at a time, and they are hot with respect to ground. (see What's hot is hot and whats not is ground) Sooo, an unsuspecting homeowner who takes chances working on circuits while they're hot (not a good idea!) could get zapped if s/he thought that the either the red or black wire connecting the switches was not hot. Remember, the wires that go between the switches can be any color (depending on the last person who wired the system!) so don't go grabbing a white wire thinking it is always ground!! But I digress. The blue dotted lines mean that a switch member moves between the two wires. So, when switch #1 is in the "A" position and switch #2 is in the "A" position, the lamp will be on. If either switch is flipped to the "B" position the lamp will go out. Furthermore if switch #1 is in the "B" position and switch #2 is in the "B" position (lamp on) and someone flips either switch into the alternate position the lamp will go out. It's really quite simple, no??
So, what can go wrong with a 3 way switch? Normally, only one would fail at a time. If the number 1 switch fails it will not be able to supply the power to the other switch via either its A or B position. The light would be able to be turned off and on via the number 2 switch only if the number 1 switch is in only one position and not the other. In that case you would replace the number 1 switch. If the number 2 switch were to fail at the A contact the number one switch would not be able to turn the light on when number 2 were in the A position. Replace the number 2 switch. A simple voltmeter will end all confusion. Just measure the voltage from common to each of the terminals on the number 1 switch and flip it back and forth. The voltage should appear on both terminals in alternating fashion. If not, replace the switch.
Tools needed: A good straight screwdriver, a voltmeter or continuity test light and enough common sense to keep one hand in your pocket while doing the testing so as to not get the shock of your life, or death as the case may be. See the article on "What's hot is hot and what's not is ground". A tool workbench with storage drawers can be helpful for organizing your tools. Most people have a workbench so it makes sense to use it for storage.
Copyright © 1996, 1997, 1998, 1999 by Bob Hewitt - All rights reserved